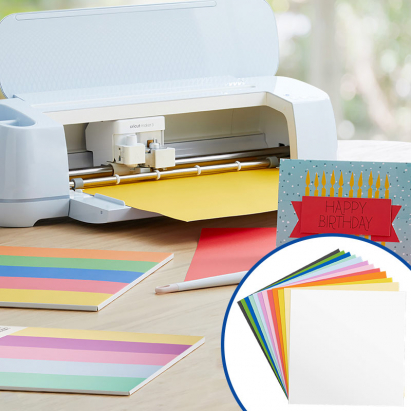
Adhesive cardstock suitable for cutting without a mat with Cricut Maker 3 and 4 and Explore 3 and 4 vinyl cutters. Especially useful for scrapbooking and crafting projects.
Cardstock from the Smart Materials line with adhesive backing and a weight of 210g/m2
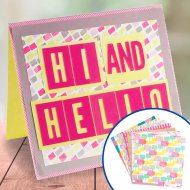
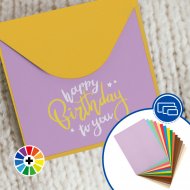
Ideal for making decals, stickers, cards, labels, signs, planners, scrapbooks, decorating laptop or phone cases...
Smart material Cricut Smart Sticker Cardstock applicable on non-textured papers like Kraft paper or plain cardstocks
Adhered to a liner that allows direct cutting with Cricut Maker 3 and Explore 3 plotters without a mat, the material slides without bending
Coloured front and adhesive back protected with watermarked paper
Colour pack include 2 cardstocks of each colour:
Bright colours: yellow, cardinal red, blue, green, and orange
THINGS TO KEEP IN MIND
If the cardstock is less than 15.24 cm long or more than 33 cm wide, a drag mat will be needed to align and cut it correctly
Can be cut with other cutting plotters using a mat. Only Cricut Maker 3 and Explore 3 allow cutting without a mat
Leave a small margin of material above and below the design so that the rollers can grip and load the cardstock
If the material bends when loading, the plotter will try to smooth it during measurement. If it is not completely flat, press unload and reload it
For projects that include drawing with a pen or marker, use the attach tool to position the drawing layer before sending it to the plotter
TIPS AND TRICKS
Create decorative mandalas by combining the bright colour assortment. Design different shapes on each cardstock and stick one on top of the other so that they all fit together in a mandala shape
Save leftover cardstock and use it by cutting it with a cutting mat
Once the cardstock is adhered, use a spatula over it to stick it perfectly and remove any wrinkles
MEASUREMENTS
Cardstock (cm | in)
33 x 33 | 13" x 13"
Package (cm)
33.2 x 36.1 x 1.1
Pack weight (g)
549
WHAT DO YOU NEED TO USE THIS CARDSTOCK?
Cricut Explore 3 or Cricut Maker 3 cutting plotter (with or without cutting mat) or any plotter with a cutting mat
Design Space application on a computer or mobile phone
Premium fine-point blade and blade holder
Adhesive cardstock
INSTRUCTIONS FOR USE
Create your design in the Design Space software and select make it (*)
Choose the material loading style (with or without mat) and the type of material, in this case, Smart Sticker Cardstock or adhesive cardstock
Align the cardstock in the guides and slide it into the plotter
Press the load button. The plotter will check that there is enough material to complete the design (**)
Press the go button and the plotter will start working on the project
Once the cut is complete, press the unload button
If you have used markers or pens, allow the ink to dry before handling the cardstock
(*) For Design Space projects that include drawing shapes, you must use attach to hold the drawing layers to the corresponding cutting layers.
(**) For projects that include drawing, the software will prompt you to load a marker and, when the time comes, to insert the blade.
https://www.brildor.com/en/cricut-smart-sticker-cardstock28190Cricut Smart Sticker Cardstock <p><a name="know-more"></a></p>
<h2>More information about Cricut Adhesive Cardstock</h2>
<p> </p>
<p><strong>INDEX</strong></p>
<p>> <a href="#know-more1">Description</a></p>
<p>> <a href="#know-more2">Things to keep in mind</a></p>
<p>> <a href="#know-more3">Tips and tricks</a></p>
<p>> <a href="#know-more4">Measurements</a></p>
<p>> <a href="#know-more5">What do you need to use this cardstock?</a></p>
<p>> <a href="#know-more6">Instructions for use</a></p>
<p> </p>
<p><a name="know-more1"></a></p>
<p><strong>DESCRIPTION</strong></p>
<ul>
<li>Ideal for making decals, stickers, cards, labels, signs, planners, scrapbooks, decorating laptop or phone cases...</li>
<li>Smart material <strong>Cricut Smart Sticker Cardstock</strong> applicable on non-textured papers like Kraft paper or plain cardstocks</li>
<li>Adhered to a liner that allows direct cutting with Cricut Maker 3 and Explore 3 plotters without a mat, the material slides without bending</li>
<li>Coloured front and adhesive back protected with watermarked paper</li>
<li>Colour pack include 2 cardstocks of each colour:<br>
<ul>
<li>Bright colours: yellow, cardinal red, blue, green, and orange</li>
</ul>
</li>
</ul>
<p> </p>
<p><a name="know-more2"></a></p>
<p><strong>THINGS TO KEEP IN MIND</strong></p>
<ul>
<li>If the cardstock is less than <span class="azul-negrita"><strong>15.24 cm</strong></span> long or more than <span class="azul-negrita"><strong>33 cm</strong></span> wide, a drag mat will be needed to align and cut it correctly</li>
<li>Can be cut with other cutting plotters using a mat. Only Cricut Maker 3 and Explore 3 allow cutting without a mat</li>
<li>Leave a small margin of material above and below the design so that the rollers can grip and load the cardstock</li>
<li>If the material bends when loading, the plotter will try to smooth it during measurement. If it is not completely flat, press <strong>unload</strong> and reload it</li>
<li>For projects that include drawing with a pen or marker, use the <strong>attach</strong> tool to position the drawing layer before sending it to the plotter</li>
</ul>
<p> </p>
<p><a name="know-more3"></a></p>
<p><strong>TIPS AND TRICKS</strong></p>
<ul>
<li>Create decorative mandalas by combining the bright colour assortment. Design different shapes on each cardstock and stick one on top of the other so that they all fit together in a mandala shape</li>
<li>Save leftover cardstock and use it by cutting it with a cutting mat</li>
<li>Once the cardstock is adhered, use a spatula over it to stick it perfectly and remove any wrinkles</li>
</ul>
<p> </p>
<p><a name="know-more4"></a></p>
<p><strong>MEASUREMENTS</strong></p>
<table>
<tbody>
<tr>
<td><strong>Cardstock (cm | in)<br></strong></td>
<td class="azul-negrita">33 x 33 <strong>|</strong> 13" x 13"</td>
</tr>
<tr>
<td><strong>Package (cm)<br></strong></td>
<td class="azul-negrita">33.2 x 36.1 x 1.1</td>
</tr>
<tr>
<td><strong>Pack weight (g)<br></strong></td>
<td class="azul-negrita">549</td>
</tr>
</tbody>
</table>
<p> </p>
<p><a name="know-more5"></a></p>
<p><strong>WHAT DO YOU NEED TO USE THIS CARDSTOCK?</strong></p>
<ul>
<li>Cricut Explore 3 or Cricut Maker 3 cutting plotter (with or without cutting mat) or any plotter with a cutting mat</li>
<li>Design Space application on a computer or mobile phone</li>
<li>Premium fine-point blade and blade holder</li>
<li>Adhesive cardstock</li>
</ul>
<p> </p>
<p><a name="know-more6"></a></p>
<p><strong>INSTRUCTIONS FOR USE</strong></p>
<ul>
<li>Create your design in the Design Space software and select <strong>make it </strong><sup>(*)</sup></li>
<li>Choose the material loading style (with or without mat) and the type of material, in this case, Smart Sticker Cardstock or adhesive cardstock</li>
<li>Align the cardstock in the guides and slide it into the plotter</li>
<li>Press the <strong>load</strong> button. The plotter will check that there is enough material to complete the design <sup>(**)</sup></li>
<li>Press the <strong>go</strong> button and the plotter will start working on the project</li>
<li>Once the cut is complete, press the <strong>unload</strong> button</li>
<li>If you have used markers or pens, allow the ink to dry before handling the cardstock</li>
</ul>
<p><span style="font-size: small;"><sup>(*)</sup> For Design Space projects that include drawing shapes, you must use <strong>attach</strong> to hold the drawing layers to the corresponding cutting layers.</span></p>
<p><span style="font-size: small;"><sup>(**)</sup> For projects that include drawing, the software will prompt you to load a marker and, when the time comes, to insert the blade.</span></p>https://www.brildor.com/media/catalog/product/c/r/cricut-smart-sticker-cardstock-cartulinas-adhesivas.jpg7.99instock07.99000https://www.brildor.com/media/catalog/product/c/r/cricut-smart-sticker-cardstock-cartulinas-adhesivas.jpg2353225633256432576925986259922638627471278794305943355/Arts & Crafts/Arts & Crafts/Paper & Card/Vinyl Cutters/Vinyl Cutters/Cricut/Vinyl Cutters/Cricut/Accessories & Consumables/Outlet/Outlet/Otros2021-07-24T06:00:22+0000