Metal pliers with plastic handle. Lightweight and easy to use
Ergonomic handle for greater comfort
Punches paper, cardboard, textiles, thin aluminium, leather, EVA foam, plastic, etc.
Regulator that sets the distance from the edge to the punching point: 0-25 mm
Makes holes with a diameter of 3 mm (1/8'') and 5 mm (3/16'')
Suitable for setting metal and plastic eyelets
Locking system makes it more compact for easy storage
Central mouth with 2 removable cubes for placing eyelets of various sizes
In Related Products, you will find different types of eyelets to customise your favourite materials and supports
Presented in a plastic blister with a hole for display
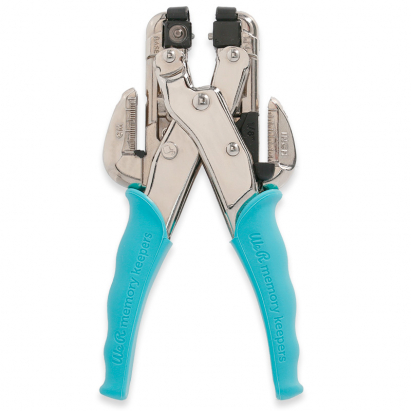
FUNCTIONAL PARTS OF THE CROP-A-DILE PLIERS
DIMENSIONS
Pliers (cm)
8.3 x 19.3 x 2.9
Maximum hole-edge distance (cm)
2.5
Maximum material thickness (cm)
3.6
Pliers packaging (cm)
16 x 28.8 x 3.5
INSTRUCTIONS FOR USING THE PLIERS
Choose the eyelet you want to place in the hole you just made
Measure the distance from the edge of the material to where you want the eyelet. Adjust the pliers' stop to the desired measurement
Press to punch the hole
Adjust the squares on the base and the top of the pliers according to the configuration that corresponds to the chosen eyelet or embellishment (see diagram):
Insert the eyelet into the hole
Ensure the cubes are properly aligned before pressing, with the top of the eyelet matching the "TOP" side and the bottom matching the "BASE"
Squeeze the pliers
Once you have set the eyelet, remove the newly customised material
THINGS TO KEEP IN MIND
Holes are punched with the side mouths according to the hole size. To set the eyelets, once placed, use the central part
Before setting eyelets on thin textiles, it is advisable to clean the fibres to avoid clogging the pliers
When setting plastic eyelets, operate the pliers carefully, applying pressure according to the material's resistance
For plastic eyelets or embellishments, it is recommended to use the configuration for flat embellishments
https://www.brildor.com/en/crop-a-dile-eyelet-pliers-we-r-case27742Crop-A-Dile Eyelet Pliers by We R<p><a name="know-more"></a></p>
<h2>More information about the We R Crop-A-Dile Eyelet Pliers</h2>
<p> </p>
<p><strong>INDEX</strong></p>
<p>> <a href="#know-more1">Description</a></p>
<p>> <a href="#know-more2">Functional parts of the pliers</a></p>
<p>> <a href="#know-more4">Dimensions</a></p>
<p>> <a href="#know-more5">Instructions for using the pliers</a></p>
<p>> <a href="#know-more6">Things to keep in mind</a></p>
<p> </p>
<p><a name="know-more1"></a></p>
<p><strong>DESCRIPTION</strong></p>
<ul>
<li>Metal pliers with plastic handle. Lightweight and easy to use</li>
<li>Ergonomic handle for greater comfort</li>
<li>Punches paper, cardboard, textiles, thin aluminium, leather, EVA foam, plastic, etc.</li>
<li>Regulator that sets the distance from the edge to the punching point: <span class="azul-negrita">0-25 mm</span></li>
<li>Makes holes with a diameter of <span class="azul-negrita">3 mm</span> (<span class="azul-negrita">1/8''</span>) and <span class="azul-negrita">5 mm</span> (<span class="azul-negrita">3/16''</span>)</li>
<li>Suitable for setting metal and plastic eyelets</li>
<li>Locking system makes it more compact for easy storage</li>
<li>Central mouth with 2 removable cubes for placing eyelets of various sizes</li>
<li>In <strong>Related Products</strong>, you will find different types of eyelets to customise your favourite materials and supports</li>
<li>Presented in a plastic blister with a hole for display</li>
</ul>
<p> </p>
<p><a name="know-more2"></a></p>
<p><strong>FUNCTIONAL PARTS OF THE CROP-A-DILE PLIERS<br></strong></p>
<p><img title="Funciones Alicate Crop-A-Dile" src="https://www.brildor.com/media/wysiwyg/rotulacion/alicate-ojales-crop-a-dile-we-r-dl-en.jpg"></p>
<p> </p>
<p><a name="know-more4"></a></p>
<p><strong>DIMENSIONS</strong></p>
<table>
<tbody>
<tr>
<td><strong>Pliers (cm)</strong></td>
<td class="azul-negrita">8.3 x 19.3 x 2.9</td>
</tr>
<tr>
<td><strong>Maximum hole-edge distance (cm)</strong></td>
<td class="azul-negrita">2.5</td>
</tr>
<tr>
<td><strong>Maximum material thickness (cm)</strong></td>
<td class="azul-negrita">3.6</td>
</tr>
<tr>
<td><strong>Pliers packaging (cm)</strong></td>
<td class="azul-negrita">16 x 28.8 x 3.5</td>
</tr>
</tbody>
</table>
<p> </p>
<p><a name="know-more5"></a></p>
<p><strong>INSTRUCTIONS FOR USING THE PLIERS</strong></p>
<ul>
<li>Choose the eyelet you want to place in the hole you just made</li>
<li>Measure the distance from the edge of the material to where you want the eyelet. Adjust the pliers' stop to the desired measurement</li>
<li>Press to punch the hole</li>
<li>Adjust the squares on the base and the top of the pliers according to the configuration that corresponds to the chosen eyelet or embellishment (see diagram):</li>
</ul>
<p><img title="Configuraciones Ojales Crop-A-Dile" src="https://www.brildor.com/media/wysiwyg/rotulacion/ojales-crop-a-dile-we-r-dl-en.jpg"></p>
<ul>
<li>Insert the eyelet into the hole</li>
<li>Ensure the cubes are properly aligned before pressing, with the top of the eyelet matching the "TOP" side and the bottom matching the "BASE"</li>
<li>Squeeze the pliers</li>
<li>Once you have set the eyelet, remove the newly customised material</li>
</ul>
<p> </p>
<p><a name="know-more6"></a></p>
<p><strong>THINGS TO KEEP IN MIND<br></strong></p>
<ul>
<li>Holes are punched with the side mouths according to the hole size. To set the eyelets, once placed, use the central part</li>
<li>Before setting eyelets on thin textiles, it is advisable to clean the fibres to avoid clogging the pliers</li>
<li>When setting plastic eyelets, operate the pliers carefully, applying pressure according to the material's resistance</li>
<li>For plastic eyelets or embellishments, it is recommended to use the configuration for flat embellishments</li>
</ul>https://www.brildor.com/media/catalog/product/a/l/alicate-para-ojales-crop-a-dile-de-we-r-y-su-estuche-d2.jpg24.9instock024.9000https://www.brildor.com/media/catalog/product/a/l/alicate-para-ojales-crop-a-dile-de-we-r-y-su-estuche-d2.jpg26713267372674444020/Arts & Crafts/Arts & Crafts/We R Memory Keepers/Arts & Crafts/Tools & Accessories/Cutting Tools2021-07-24T06:00:29+0000