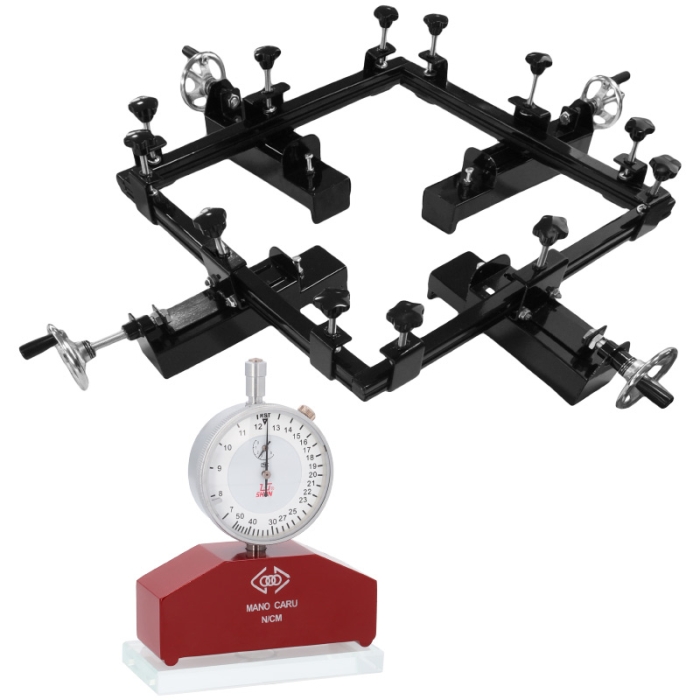
Frame made up of 4 independent metal parts. Each of these parts must be fitted on each side of the frame and the mesh, surrounding its entire perimeter
Handwheel to stretch the mesh towards the outside of the frame
Mechanical stretching allows you to tighten the entire surface of the mesh simultaneously and uniformly. This makes it easier to adhere the mesh to the frame by using fast-drying, solvent-resistant adhesives
Easy to install, use and carry
THINGS TO KEEP IN MIND
The mesh must be larger than the frame, at least 10 cm per side
By combining two of these machines, you will have 8 parts to stretch the mesh, 2 per side. This allows you to stretch meshes of up to 1.20 cm
We recommend the use of a tension meter for more precise results. It has a measuring range of 7-50 newtons
It is not recommended to use staples to fix the mesh to the wooden frame. High tension may cause tearing when piercing the fabric with staples
WHAT DOES THE MACHINE INCLUDE?
4
Bases
4
Mesh clamps
4
Handles for the stretching handwheels
MACHINE COMPONENTS FOR EACH METAL PART
3 clamps: hold the bars and keep them steady, at the same height as the base
1 bar with 2 platens: each bar is made up of 2 platens to hold the mesh. They must be placed inside the clamps, above and below the mesh like a sandwich. The lower bar is fixed, while the other can be removed. The part of the bar that touches the mesh is made of corrugated rubber for a better grip
3 adjustment knobs: to keep the mesh fixed inside the clamps while stretching the screen. They have a pressure-resistant conical washer at the lower end, which prevents damage to the contact surface of the bolt (upper bar)
1 base serves as a support and is perpendicular to the bars. It has 2 slots allowing the bars to slide. Sliding it forward or backwards will help adjust the structure to the frame. When stretching, the frame sits between the bars and a metal plate that works as a stopper
1 adjustment wheel: allows you to move the bar back and forth through the slots. The handwheel rotates and moves along a metal bolt. This bolt has 3 lock washers to prevent any damage due to pressure. The washers remain between the base and the handle when they reach the stop
DIMENSIONS (APPROX.)
Metal part (cm)
60 x 20 x 48.5
Wrap (cm)
60 x 4.5 x 3
Bar (cm)
60 x 2 x 3
Base (cm)
8 x 10 x 35
Packaging (cm)
66 x 18 x 51
INSTALLATION AND OPERATING INSTRUCTIONS
ASSEMBLING EACH PART OF THE MACHINE
To assemble each metal part you need 1 base, 1 bar with 2 platens, 3 clamps, 3 adjustment bolts and 1 adjustment wheel.
Place the mesh clamp on the base. The central adjustment bolt must be positioned in the centre of the bar
Fix the bars to the central clamp by adjusting the washers and the nuts. Use a 14” spanner to do this
Place the plastic handle on the adjusting wheel and fasten the wheel with the nut
HOW TO USE THE SCREEN STRETCHING MACHINE FOR SCREEN PRINTING FRAMES?
Place the parts of the machine on a flat surface suitable for this task
The frame must have a thickness no greater than 5.5 cm and a maximum outer diameter of 60 x 60 cm. The size of the mesh must be larger than the frame, minimum 10 cm per side
Put on each side of the frame one of the 4 machine parts
Insert the frame into each base, with the front side facing upwards. The frame profile should be placed over the base slots, between the plate acting as a stopper and the bars
Sandwich the mesh between the bars
Tighten the bolts so that the mesh is securely held by the bars. Make sure that each bar has the same amount of mesh
Turn the wheels until you reach the desired tension
Apply a layer of adhesive on the mesh and the frame, following the adhesive’s instructions
Wait for the adhesive to set completely, then remove the parts of the stretcher
https://www.brildor.com/en/manual-screen-stretching-machine48837Manual Screen Stretching Machine<p><a name="know-more"></a></p>
<h2>More information about the manual screen stretching machine</h2>
<p> </p>
<p><strong>INDEX</strong></p>
<p>> <a href="#know-more1">Description</a></p>
<p>> <a href="#know-more2">Things to keep in mind</a></p>
<p>> <a href="#know-more3">What does the machine include?</a></p>
<p>> <a href="#know-more4">Machine component for each metal part</a></p>
<p>> <a href="#know-more5">Dimensions (approx.)</a></p>
<p>> <a href="#know-more6">Installation and operating instructions</a></p>
<p> </p>
<p><a name="know-more1"></a></p>
<p><strong>DESCRIPTION</strong></p>
<ul>
<li>Frame made up of 4 independent metal parts. Each of these parts must be fitted on each side of the frame and the mesh, surrounding its entire perimeter</li>
<li>Handwheel to stretch the mesh towards the outside of the frame</li>
<li>Mechanical stretching allows you to tighten the entire surface of the mesh simultaneously and uniformly. This makes it easier to adhere the mesh to the frame by using fast-drying, solvent-resistant adhesives</li>
<li>Easy to install, use and carry</li>
</ul>
<p> </p>
<p><a name="know-more2"></a></p>
<p><strong>THINGS TO KEEP IN MIND</strong></p>
<ul>
<li>The mesh must be larger than the frame, at least <span class="azul-negrita">10 cm</span> per side</li>
<li>By combining two of these machines, you will have 8 parts to stretch the mesh, 2 per side. This allows you to stretch meshes of up to <span class="azul-negrita">1.20 cm</span></li>
<li>We recommend the use of a tension meter for more precise results. It has a measuring range of <span class="azul-negrita">7-50 newtons</span></li>
<li>It is not recommended to use staples to fix the mesh to the wooden frame. High tension may cause tearing when piercing the fabric with staples</li>
</ul>
<p> </p>
<p><a name="know-more3"></a></p>
<p><strong>WHAT DOES THE MACHINE INCLUDE?</strong></p>
<table>
<tbody>
<tr>
<td>4</td>
<td>Bases</td>
</tr>
<tr>
<td>4</td>
<td>Mesh clamps</td>
</tr>
<tr>
<td>4</td>
<td>
<p>Handles for the stretching handwheels</p>
</td>
</tr>
</tbody>
</table>
<p> </p>
<p><a name="know-more4"></a></p>
<p><strong>MACHINE COMPONENTS FOR EACH METAL PART</strong></p>
<ul>
<li><strong>3 clamps</strong>: hold the bars and keep them steady, at the same height as the base</li>
<li><strong>1 bar with 2 platens</strong>: each bar is made up of 2 platens to hold the mesh. They must be placed inside the clamps, above and below the mesh like a sandwich. The lower bar is fixed, while the other can be removed. The part of the bar that touches the mesh is made of corrugated rubber for a better grip</li>
<li><strong>3 adjustment knobs</strong>: to keep the mesh fixed inside the clamps while stretching the screen. They have a pressure-resistant conical washer at the lower end, which prevents damage to the contact surface of the bolt (upper bar)</li>
<li><strong>1 base</strong> serves as a support and is perpendicular to the bars. It has 2 slots allowing the bars to slide. Sliding it forward or backwards will help adjust the structure to the frame. When stretching, the frame sits between the bars and a metal plate that works as a stopper</li>
<li><strong>1 adjustment wheel</strong>: allows you to move the bar back and forth through the slots. The handwheel rotates and moves along a metal bolt. This bolt has 3 lock washers to prevent any damage due to pressure. The washers remain between the base and the handle when they reach the stop</li>
</ul>
<p> </p>
<p><a name="know-more5"></a></p>
<p><strong>DIMENSIONS (APPROX.)</strong></p>
<table>
<tbody>
<tr>
<td>Metal part (cm)</td>
<td class="azul-negrita">60 x 20 x 48.5</td>
</tr>
<tr>
<td>Wrap (cm)</td>
<td class="azul-negrita">60 x 4.5 x 3</td>
</tr>
<tr>
<td>Bar (cm)</td>
<td class="azul-negrita">60 x 2 x 3</td>
</tr>
<tr>
<td>Base (cm)</td>
<td class="azul-negrita">8 x 10 x 35</td>
</tr>
<tr>
<td>Packaging (cm)</td>
<td class="azul-negrita">66 x 18 x 51</td>
</tr>
</tbody>
</table>
<p> </p>
<p><a name="know-more6"></a></p>
<p><strong>INSTALLATION AND OPERATING INSTRUCTIONS</strong></p>
<p><strong>ASSEMBLING EACH PART OF THE MACHINE</strong></p>
<p>To assemble each metal part you need 1 base, 1 bar with 2 platens, 3 clamps, 3 adjustment bolts and 1 adjustment wheel.</p>
<ul>
<li>Place the mesh clamp on the base. The central adjustment bolt must be positioned in the centre of the bar</li>
<li>Fix the bars to the central clamp by adjusting the washers and the nuts. Use a <span class="azul-negrita">14”</span> spanner to do this</li>
<li>Place the plastic handle on the adjusting wheel and fasten the wheel with the nut</li>
</ul>
<p><strong>HOW TO USE THE SCREEN STRETCHING MACHINE FOR SCREEN PRINTING FRAMES?</strong></p>
<ul>
<li>Place the parts of the machine on a flat surface suitable for this task</li>
<li>The frame must have a thickness no greater than <span class="azul-negrita">5.5 cm</span> and a maximum outer diameter of <span class="azul-negrita">60 x 60 cm. </span>The size of the mesh must be larger than the frame, minimum <span class="azul-negrita">10 cm</span> per side</li>
<li>Put on each side of the frame one of the 4 machine parts</li>
<li>Insert the frame into each base, with the front side facing upwards. The frame profile should be placed over the base slots, between the plate acting as a stopper and the bars</li>
<li>Sandwich the mesh between the bars</li>
<li>Tighten the bolts so that the mesh is securely held by the bars. Make sure that each bar has the same amount of mesh</li>
<li>Turn the wheels until you reach the desired tension</li>
<li>Apply a layer of adhesive on the mesh and the frame, following the adhesive’s instructions</li>
<li>Wait for the adhesive to set completely, then remove the parts of the stretcher</li>
<li>Trim off the excess mesh</li>
</ul>https://www.brildor.com/media/catalog/product/m/a/maquina-manual-extensible-entelado-marcos-serigrafia-d10.jpg179outofstock0179000https://www.brildor.com/media/catalog/product/m/a/maquina-manual-extensible-entelado-marcos-serigrafia-d10.jpg469416775167764452144876/Screen Printing/Screen Printing/Screen Preparation/Screen Printing/Machines2022-10-17T14:13:23+0000