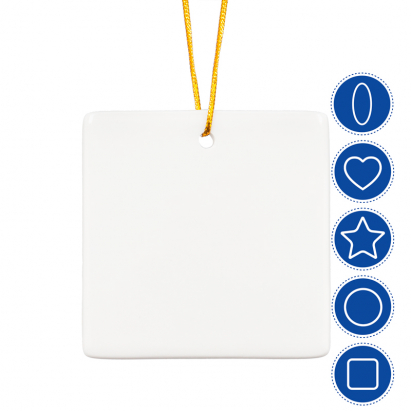
Tile-like ornaments with rounded corners and edges
Hole for inserting cords, ribbons, or any type of hanger
Customisable with a flat transfer press or sublimation oven
THINGS TO KEEP IN MIND
Prolonged exposure to the elements may cause the sublimated image to fade. If you wish to hang it outdoors, we recommend using a protective varnish (Ref. 943435)
Tie the cord to the ornament after sublimation
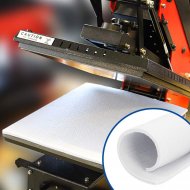
Due to its rounded edges, it is advisable to use the Nomex protective pad (Ref. 922929) for sublimating this ornament. This will prevent the image from blurring at the edges during sublimation
SUBLIMATION RECOMMENDATIONS
If the ornament has been stored in a cold place, it may have accumulated moisture, which can affect sublimation. In such circumstances, it is advisable to:
Pre-press or pre-heat the ornament with the sublimable side up and protective paper, at 175 ºC for 5-10 seconds with medium-high pressure
Allow the ornament to cool before starting the sublimation process
MEASUREMENTS
Ref.
040929
055958
055961
055960
055959
Shape
Oval
Square
Heart
Star
Round
Printing area (cm)
6 x 8.2
7 x 7
7.5 x 8
8 x 8
Ø9
Ornament (cm)
6 x 8.2 x 0.4
7 x 7 x 0.4
7.5 x 8 x 0.4
8 x 8 x 0.4
Ø9 x 0.4
Thickness (mm)
4
4
4
4
4
Hole (mm)
Ø5
Ø5
Ø5
Ø5
Ø5
Golden cord (cm)
0.1 x 22
0.2 x 12
0.2 x 12
0.2 x 12
0.2 x 12
Weight (g)
37
49
39
32
93
RECOMMENDED SUBLIMATION INSTRUCTIONS AND PARAMETERS
Parameters indicated as guidelines. It is recommended to conduct preliminary tests to make necessary adjustments before starting production.
TRANSFER PRESS
Print the paper in mirror mode and cut it out
Set the press to 175 ºC
Use a Nomex pad on the lower plate of the press to ensure even heat distribution
Place the printed paper on the ornament and secure it with thermal tape. Place the ornament and paper with the sublimable side down on the press plate
Press at 175 ºC, medium-high pressure for 300 seconds
With the help of a protective glove, remove the newly sublimated ornament
Carefully remove the printed paper
SUBLIMATION OVEN
Print the design you wish to stamp on the ornament in mirror mode
Heat the oven to 200 ºC
Place the printed design face down on the white side of the ornament and secure them with heat-resistant tape
If using a 3D oven, place the ornament with the side to be printed facing up. Close the membrane and create a vacuum. Ensure there are no air bubbles on the surface
Another option is to use shrink bags. With the help of a heat gun, secure the design to the ornament, removing all air from inside
Close the oven and operate it for 13 minutes
Open the oven and with the help of a protective glove, remove the newly sublimated ornament
https://www.brildor.com/en/sublimable-ceramic-hanging-ornaments53974Sublimable Ceramic Hanging Ornaments<p class="enlace"><a id="know-more"></a> </p>
<h2>More information about the Sublimable Ceramic Hanging Ornaments</h2>
<p> </p>
<p><strong>INDEX</strong></p>
<p>> <a href="#know-more1">Description</a></p>
<p>> <a href="#know-more2">Things to keep in mind</a></p>
<p>> <a href="#know-more5">Sublimation recommendations</a></p>
<p>> <a href="#know-more3">Measurements</a></p>
<p>> <a href="#know-more4">Recommended sublimation instructions and parameters</a></p>
<p style="padding-left: 40px;">› <a href="#know-more6">Transfer press</a></p>
<p style="padding-left: 40px;">› <a href="#know-more7">Sublimation oven</a></p>
<p> </p>
<p><a name="know-more1"></a></p>
<p><strong>DESCRIPTION</strong></p>
<ul>
<li>Tile-like ornaments with rounded corners and edges</li>
<li>Hole for inserting cords, ribbons, or any type of hanger</li>
<li>Customisable with a flat transfer press or sublimation oven</li>
</ul>
<p> </p>
<p><a name="know-more2"></a></p>
<p><strong>THINGS TO KEEP IN MIND</strong></p>
<ul>
<li>Prolonged exposure to the elements may cause the sublimated image to fade. If you wish to hang it outdoors, we recommend using a protective varnish (Ref. 943435)</li>
<li>Tie the cord to the ornament after sublimation</li>
<li>Due to its rounded edges, it is advisable to use the Nomex protective pad (Ref. 922929) for sublimating this ornament. This will prevent the image from blurring at the edges during sublimation</li>
</ul>
<p> </p>
<p><a name="know-more5"></a></p>
<p><strong>SUBLIMATION RECOMMENDATIONS</strong></p>
<p>If the ornament has been stored in a cold place, it may have accumulated moisture, which can affect sublimation. In such circumstances, it is advisable to:</p>
<ul>
<li>Pre-press or pre-heat the ornament with the sublimable side up and protective paper, at <span class="azul-negrita">175 ºC</span> for <span class="azul-negrita">5-10 seconds</span> with <strong>medium-high pressure</strong><span class="azul-negrita"><br></span></li>
<li>Allow the ornament to cool before starting the sublimation process</li>
</ul>
<p> </p>
<p><a name="know-more3"></a></p>
<p><strong>MEASUREMENTS</strong></p>
<table>
<tbody>
<tr>
<td><strong>Ref.</strong></td>
<td style="text-align: center;"><strong><span class="item-sku">040929</span></strong></td>
<td style="text-align: center;"><strong><span class="item-sku">055958</span></strong></td>
<td style="text-align: center;"><strong><span class="item-sku">055961</span></strong></td>
<td style="text-align: center;"><strong><span class="item-sku">055960</span></strong></td>
<td style="text-align: center;"><strong><span class="item-sku">055959</span></strong></td>
</tr>
<tr>
<td><strong>Shape</strong></td>
<td style="text-align: center;">Oval</td>
<td style="text-align: center;">Square</td>
<td style="text-align: center;">Heart</td>
<td style="text-align: center;">Star</td>
<td style="text-align: center;">Round</td>
</tr>
<tr>
<td><strong>Printing area (cm)</strong></td>
<td style="text-align: center;"><span class="azul-negrita">6 x 8.2</span></td>
<td style="text-align: center;"><span class="azul-negrita">7 x 7</span></td>
<td style="text-align: center;"><span class="azul-negrita">7.5 x 8</span></td>
<td style="text-align: center;"><span class="azul-negrita">8 x 8</span></td>
<td style="text-align: center;"><span class="azul-negrita">Ø9</span></td>
</tr>
<tr>
<td><strong>Ornament (cm)<br></strong></td>
<td style="text-align: center;"><span class="azul-negrita">6 x 8.2 x 0.4</span></td>
<td style="text-align: center;"><span class="azul-negrita">7 x 7 x 0.4</span></td>
<td style="text-align: center;"><span class="azul-negrita">7.5 x 8 x 0.4</span></td>
<td style="text-align: center;"><span class="azul-negrita">8 x 8 x 0.4</span></td>
<td style="text-align: center;"><span class="azul-negrita">Ø9 x 0.4</span></td>
</tr>
<tr>
<td><strong>Thickness (mm)</strong></td>
<td style="text-align: center;"><span class="azul-negrita">4</span></td>
<td style="text-align: center;"><span class="azul-negrita">4</span></td>
<td style="text-align: center;"><span class="azul-negrita">4</span></td>
<td style="text-align: center;"><span class="azul-negrita">4</span></td>
<td style="text-align: center;"><span class="azul-negrita">4</span></td>
</tr>
<tr>
<td><strong>Hole (mm)</strong></td>
<td style="text-align: center;"><span class="azul-negrita">Ø5</span></td>
<td style="text-align: center;"><span class="azul-negrita">Ø5</span></td>
<td style="text-align: center;"><span class="azul-negrita">Ø5</span></td>
<td style="text-align: center;"><span class="azul-negrita">Ø5</span></td>
<td style="text-align: center;"><span class="azul-negrita">Ø5</span></td>
</tr>
<tr>
<td><strong>Golden cord (cm)<br></strong></td>
<td style="text-align: center;"><span class="azul-negrita">0.1 x 22</span></td>
<td style="text-align: center;"><span class="azul-negrita">0.2 x 12</span></td>
<td style="text-align: center;"><span class="azul-negrita">0.2 x 12</span></td>
<td style="text-align: center;"><span class="azul-negrita">0.2 x 12<br></span></td>
<td style="text-align: center;"><span class="azul-negrita">0.2 x 12</span></td>
</tr>
<tr>
<td><strong>Weight (g)<br></strong></td>
<td class="azul-negrita" style="text-align: center;">37</td>
<td style="text-align: center;"><span class="azul-negrita">49</span></td>
<td style="text-align: center;"><span class="azul-negrita">39</span></td>
<td style="text-align: center;"><span class="azul-negrita">32</span></td>
<td style="text-align: center;"><span class="azul-negrita">93</span></td>
</tr>
</tbody>
</table>
<p> </p>
<p><a name="know-more4"></a></p>
<p><strong>RECOMMENDED SUBLIMATION INSTRUCTIONS AND PARAMETERS</strong></p>
<p>Parameters indicated as <strong>guidelines</strong>. It is recommended to conduct preliminary tests to make necessary adjustments before starting production.</p>
<p><a name="know-more6"></a></p>
<p><span class="rojo-negrita"> </span><strong>TRANSFER PRESS</strong></p>
<ul>
<li>Print the paper in <strong>mirror mode</strong> and cut it out</li>
<li>Set the press to <span class="azul-negrita">175 ºC</span></li>
<li>Use a Nomex pad on the lower plate of the press to ensure even heat distribution</li>
<li>Place the printed paper on the ornament and secure it with thermal tape. Place the ornament and paper with the sublimable side down on the press plate</li>
<li>Press at <span class="azul-negrita">175 ºC</span>, <strong>medium-high pressure</strong> for <span class="azul-negrita">300 seconds</span></li>
<li>With the help of a protective glove, remove the newly sublimated ornament</li>
<li>Carefully remove the printed paper</li>
</ul>
<p><a name="know-more7"></a></p>
<p><strong>SUBLIMATION OVEN<br></strong></p>
<ul>
<li>Print the design you wish to stamp on the ornament in mirror mode</li>
<li>Heat the oven to <span class="azul-negrita">200 ºC</span></li>
<li>Place the printed design face down on the white side of the ornament and secure them with heat-resistant tape</li>
<li>If using a 3D oven, place the ornament with the side to be printed facing up. Close the membrane and create a vacuum. Ensure there are no air bubbles on the surface</li>
<li>Another option is to use shrink bags. With the help of a heat gun, secure the design to the ornament, removing all air from inside</li>
<li>Close the oven and operate it for <span class="azul-negrita">13 minutes</span><span class="azul-negrita"><br></span></li>
<li>Open the oven and with the help of a protective glove, remove the newly sublimated ornament</li>
<li>Carefully remove the printed paper</li>
</ul>https://www.brildor.com/media/catalog/product/a/z/azulejos-colgar-sublimables-d1.jpg1.95instock01.95000https://www.brildor.com/media/catalog/product/a/z/azulejos-colgar-sublimables-d1.jpg14086229292326526670273434305950439/Blanks/Blanks/Homeware/Blanks/Christmas/Blanks/Christmas/Tree Ornaments2025-03-31T13:59:41+0000

 Sublimate TILES flawlessly with NOMEX