The store will not work correctly in the case when cookies are disabled.
JavaScript seems to be disabled in your browser.
For the best experience on our site, be sure to turn on Javascript in your browser.
Sublimable Fabric Patches
Polyester patches customisables by dye sublimation printing .
Ripped edges in white or black
They require hot-melt adhesive foil to fix them. Must be purchased separately
More information
Our availability is not enough?
Let us know how much you need
I WANT MORE
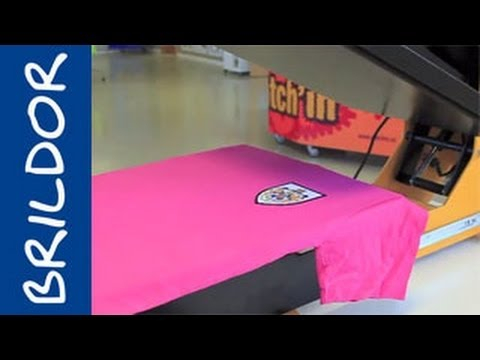
HOW TO MAKE CLOTHING PATCHES - SUBLIMATION and DTF
More information about the Sublimable Fabric Patches
INDEX
> Description
> Things to keep in mind
> Dimensions
> Recommended instructions and parameters for sublimation printing
> Related posts
DESCRIPTION
Perfect for personalising garments, backpacks, caps...
Backing coated with flanneline (interlining) which gives rigidity to the patch
They can be applied to any fabric by sewing or gluing them on. You will find different stickers at Related Products
They can also be customised with other techniques such as DTF y embroidery
THINGS TO KEEP IN MIND
The patches rectangular stickers from Ref. 055586 and Ref. 055587 have the rounded edges
The edge white of the patches is sublimable
DIMENSIONS
References
055590 055591
055588 055589
055582 055583
055580 055581
055576 055577
055578 055579 055584 055585
055586 055587
Shape
Round
Round
Oval
Oval
Shield
Shield
Rectangular
Rectangular
Patch (cm)
Ø8
Ø10
11.5 x 6.5
12 x 9
8 x 8
8 x 10
10 x 5
11.5 x 6.5
Thickness (mm)
1
1
1
1
1
1
1
1
Print area
Ø7.3
9.3
10.7 x 5.7
11.3 x 8.3
7.4 x 7.4
7.4 x 9.3
9.5 x 4.3
10.8 x 5.8
Print area
Ø8
Ø10
11.5 x 6.5
12 x 9
8 x 8
8 x 10
10 x 5
11.5 x 6.5
Weight (g)
1
2
1
2
1
2
1
2
RECOMMENDED INSTRUCTIONS AND PARAMETERS FOR SUBLIMATION PRINTING
Parameters indicated with as a guideline . It is recommended to carry out preliminary tests in order to make the necessary adjustments before starting production.
Print the design at mirror image
Preheat the press to 190 °C
Place protective paper on the plate of the press
Place the patch on the protective paper with the front side facing up and the printed side of the patch on the paper on the patch
Place protective paper over them
Close the press at a pressure half for 50 seconds
With the help of a protective glove, remove the freshly applied patch sublimated
Peel off the paper carefully
RELATED POSTS
Patches for dye sublimation printingIt couldn't be easier!
More Information
Ref.
948353
Colour
White, Black
Surface material
Tissue
Items
Patches
Composition
Polyester
Marking techniques
Dye sublimation, DTF, DTG, Embroidery, Rhinestones
https://www.brildor.com/en/sublimable-fabric-patches
48353
Sublimable Fabric Patches
<p class="enlace"><a id="saber-mas"></a> </p>
<h2>More information about the Sublimable Fabric Patches</h2>
<p> </p>
<p><strong>INDEX</strong></p>
<p>> <a href="#saber-mas1">Description</a></p>
<p>> <a href="#saber-mas2">Things to keep in mind</a></p>
<p>> <a href="#saber-mas3">Dimensions</a></p>
<p>> <a href="#saber-mas4">Recommended instructions and parameters for sublimation printing</a></p>
<p>> <a href="#saber-mas5">Related posts</a></p>
<p> </p>
<p class="enlace"><a id="saber-mas1"></a> </p>
<p><strong>DESCRIPTION</strong></p>
<ul>
<li>Perfect for personalising garments, backpacks, caps...</li>
<li>Backing coated with flanneline (interlining) which gives rigidity to the patch</li>
<li>They can be applied to any fabric by sewing or gluing them on. You will find different stickers at <strong>Related Products</strong></li>
<li>They can also be customised with other techniques such as <span class="azul-brildor-negrita">DTF</span> y <span class="azul-brildor-negrita">embroidery</span></li>
</ul>
<p> </p>
<p class="enlace"><a id="saber-mas2"></a> </p>
<p><strong>THINGS TO KEEP IN MIND</strong></p>
<ul>
<li>The patches rectangular stickers from Ref. 055586 and Ref. 055587 have the rounded edges</li>
<li>The edge white of the patches is sublimable</li>
</ul>
<p> </p>
<p class="enlace"><a id="saber-mas3"></a> </p>
<p><strong>DIMENSIONS<br></strong></p>
<table>
<tbody>
<tr>
<td>
<p><strong>References</strong></p>
</td>
<td style="text-align: center;">
<p><strong>055590</strong><br><strong>055591</strong></p>
</td>
<td style="text-align: center;">
<p><strong>055588</strong><br><strong>055589</strong></p>
</td>
<td style="text-align: center;">
<p><strong>055582</strong><br><strong>055583</strong></p>
</td>
<td style="text-align: center;">
<p><strong>055580</strong><br><strong>055581</strong></p>
</td>
<td style="text-align: center;">
<p><strong>055576</strong><br><strong>055577</strong></p>
</td>
<td style="text-align: center;"><strong>055578</strong><br><strong>055579</strong></td>
<td style="text-align: center;"><strong>055584</strong><br><strong>055585</strong></td>
<td style="text-align: center;">
<p><strong>055586</strong><br><strong>055587</strong></p>
</td>
</tr>
<tr>
<td>
<p><strong>Shape<br></strong></p>
</td>
<td style="text-align: center;">
<p>Round</p>
</td>
<td style="text-align: center;">Round</td>
<td style="text-align: center;">
<p>Oval</p>
</td>
<td style="text-align: center;">
<p>Oval</p>
</td>
<td style="text-align: center;">
<p>Shield</p>
</td>
<td style="text-align: center;">
<p>Shield</p>
</td>
<td style="text-align: center;">
<p>Rectangular</p>
</td>
<td style="text-align: center;">
<p>Rectangular</p>
</td>
</tr>
<tr>
<td>
<p><strong>Patch (cm)</strong></p>
</td>
<td style="text-align: center;">
<p><span class="azul-negrita">Ø8</span></p>
</td>
<td style="text-align: center;">
<p><span class="azul-negrita">Ø10</span></p>
</td>
<td style="text-align: center;">
<p><span class="azul-negrita">11.5 x 6.5</span></p>
</td>
<td style="text-align: center;">
<p><span class="azul-negrita">12 x 9</span></p>
</td>
<td style="text-align: center;">
<p><span class="azul-negrita">8 x 8</span></p>
</td>
<td style="text-align: center;">
<p><span class="azul-negrita">8 x 10</span></p>
</td>
<td style="text-align: center;">
<p><span class="azul-negrita">10 x 5</span></p>
</td>
<td style="text-align: center;">
<p><span class="azul-negrita">11.5 x 6.5</span></p>
</td>
</tr>
<tr>
<td>
<p><strong>Thickness (mm)</strong></p>
</td>
<td style="text-align: center;">
<p><span class="azul-negrita">1</span></p>
</td>
<td style="text-align: center;">
<p><span class="azul-negrita">1</span></p>
</td>
<td style="text-align: center;">
<p><span class="azul-negrita">1</span></p>
</td>
<td style="text-align: center;">
<p><span class="azul-negrita">1</span></p>
</td>
<td style="text-align: center;">
<p><span class="azul-negrita">1</span></p>
</td>
<td style="text-align: center;">
<p><span class="azul-negrita">1</span></p>
</td>
<td style="text-align: center;">
<p><span class="azul-negrita">1</span></p>
</td>
<td style="text-align: center;">
<p><span class="azul-negrita">1</span></p>
</td>
</tr>
<tr>
<td>
<p><strong>Print area<br>with edge (cm)</strong></p>
</td>
<td style="text-align: center;">
<p><span class="azul-negrita">Ø7.3</span></p>
</td>
<td style="text-align: center;">
<p><span class="azul-negrita">9.3</span></p>
</td>
<td style="text-align: center;">
<p><span class="azul-negrita">10.7 x 5.7</span></p>
</td>
<td style="text-align: center;">
<p><span class="azul-negrita">11.3 x 8.3</span></p>
</td>
<td style="text-align: center;">
<p><span class="azul-negrita">7.4 x 7.4</span></p>
</td>
<td style="text-align: center;">
<p><span class="azul-negrita">7.4 x 9.3</span></p>
</td>
<td style="text-align: center;">
<p><span class="azul-negrita">9.5 x 4.3</span></p>
</td>
<td style="text-align: center;">
<p><span class="azul-negrita">10.8 x 5.8</span></p>
</td>
</tr>
<tr>
<td>
<p><strong>Print area<br>without edge (cm)</strong></p>
</td>
<td style="text-align: center;">
<p><span class="azul-negrita">Ø8</span></p>
</td>
<td style="text-align: center;">
<p><span class="azul-negrita">Ø10</span></p>
</td>
<td style="text-align: center;">
<p><span class="azul-negrita">11.5 x 6.5</span></p>
</td>
<td style="text-align: center;">
<p><span class="azul-negrita">12 x 9</span></p>
</td>
<td style="text-align: center;">
<p><span class="azul-negrita">8 x 8</span></p>
</td>
<td style="text-align: center;">
<p><span class="azul-negrita">8 x 10</span></p>
</td>
<td style="text-align: center;">
<p><span class="azul-negrita">10 x 5</span></p>
</td>
<td style="text-align: center;">
<p><span class="azul-negrita">11.5 x 6.5</span></p>
</td>
</tr>
<tr>
<td>
<p><strong>Weight (g)</strong></p>
</td>
<td style="text-align: center;">
<p><span class="azul-negrita">1</span></p>
</td>
<td style="text-align: center;">
<p><span class="azul-negrita">2</span></p>
</td>
<td style="text-align: center;">
<p><span class="azul-negrita">1</span></p>
</td>
<td style="text-align: center;">
<p><span class="azul-negrita">2</span></p>
</td>
<td style="text-align: center;">
<p><span class="azul-negrita">1</span></p>
</td>
<td style="text-align: center;">
<p><span class="azul-negrita">2</span></p>
</td>
<td style="text-align: center;">
<p><span class="azul-negrita">1</span></p>
</td>
<td style="text-align: center;">
<p><span class="azul-negrita">2</span></p>
</td>
</tr>
</tbody>
</table>
<p> </p>
<p class="enlace"><a id="saber-mas4"></a> </p>
<p><strong>RECOMMENDED INSTRUCTIONS AND PARAMETERS FOR SUBLIMATION PRINTING</strong></p>
<p>Parameters indicated with <strong>as a guideline</strong>. It is recommended to carry out preliminary tests in order to make the necessary adjustments before starting production.</p>
<ul>
<li>Print the design at <strong>mirror image<br></strong></li>
<li>Preheat the press to <span class="azul-negrita" style="--tw-border-spacing-x: 0; --tw-border-spacing-y: 0; --tw-translate-x: 0; --tw-translate-y: 0; --tw-rotate: 0; --tw-skew-x: 0; --tw-skew-y: 0; --tw-scale-x: 1; --tw-scale-y: 1; --tw-scroll-snap-strictness: proximity; --tw-ring-offset---tw-ring-offset-color: #fff; --tw-ring-color: rgb(59 130 246 / .5); --tw-ring-offset-shadow: 0 0 #0000; --tw-ring-shadow: 0 0 #0000; --tw-shadow: 0 0 #0000; --tw-shadow-colored: 0 0 #0000; box-sizing: border-box; scroll-margin-top: 130px; color: #4a90e2; font-weight: bold;">190 °C</span></li>
<li>Place protective paper on the plate of the press</li>
<li>Place the patch on the protective paper with the front side facing up and the printed side of the patch on the paper on the patch</li>
<li>Place protective paper over them</li>
<li>Close the press at a <strong>pressure</strong> <strong>half</strong> for <span class="azul-negrita">50 seconds</span></li>
<li>With the help of a protective glove, remove the freshly applied patch sublimated</li>
<li>Peel off the paper carefully</li>
</ul>
<p> </p>
<p class="enlace"><a id="saber-mas5"></a> </p>
<p><strong>RELATED POSTS</strong></p>
<p><a title="¡Parches para sublimación, más fácil imposible!" href="https://www.brildor.com/blog/es/parches-para-sublimacion-mas-facil-imposible/" target="_blank" rel="nofollow noopener">Patches for dye sublimation printingIt couldn't be easier!</a></p>
https://www.brildor.com/media/catalog/product/p/a/parches-tela-sublimable-d16_1.jpg
1.69
instock
0
1.69
0
0
0
https://www.brildor.com/media/catalog/product/p/a/parches-tela-sublimable-d16_1.jpg
14846
28051
44085
48514
/Blanks
/Blanks/Patches
2022-07-25T10:04:01+0000


 HOW TO MAKE CLOTHING PATCHES - SUBLIMATION and DTF