Reverse side of white matte with touch reverse side
Includes magnetic holders with adhesive to attach it to the base of the magnet after sublimation
THINGS TO KEEP IN MIND
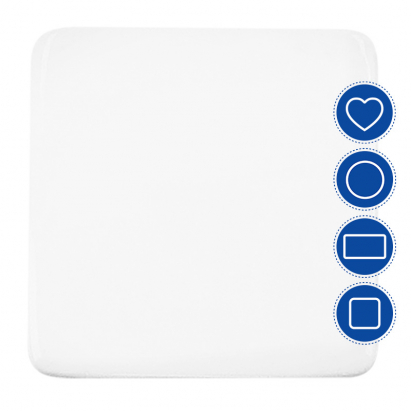
The rectangular magnets of 7 x 5 cm are only differentiated by the type of edges: rounded (Ref. 049934) and straight (Ref. 056498)
The back tile is porous, so we recommend reinforcing the adhesive of the tile sheet from the magnet. For this, you can use some glue such as the ones you will find in Related Products
The magnet can be sublimated either with the magnet face up (Method 2), as well as in reverse position (Method 1). You can see it in the instructions ofdye sublimation printing
DIMENSIONS
Reference
000505
000504
041181
053636
049934
056498
003868
Shape
Round
Square
Square
Heart
Rectangular
Rectangular
Rectangular
Dimensions (cm)
Ø5
5 x 5
6 x 6
6.5 x 6.5
7 x 5
7 x 5
8.5 x 5.4
Thickness (cm)
0.3
0.4
0.4
0.3
0.5
0.5
0.5
Magnetic holder (cm)
Ø4.5 x 0.1
4.5 x 4.5 x 0.1
5 x 5 x 0.1
5.5 x 5.2 x 0.1
6 x 4.3 x 0.1
6.2 x 4.4 x 0.1
5 x 5 x 0.1
Print area (cm)
Ø5
5 x 5
6 x 6
6.5 x 6.5
7 x 5
7 x 5
8.5 x 5.4
RECOMMENDED INSTRUCTIONS AND PARAMETERS FOR SUBLIMATION PRINTING
Parameters given for guidance only. It is recommended to carry out preliminary tests in order to make the necessary adjustments before starting production.
METHOD 1: MAGNET IN REVERSE POSITION
Print the design in mirror mode
Preheat the press to 200 ºC
Place the printed paper face up on the base of the press
Place the magnet upside down on the printed paper
Cover the ceramic magnet with a protective cloth
Close the press at medium-high pressure for 200-240 seconds
With the help of a protective glove, remove the sublimated magnet
Adhere the magnetic sheet to the base of the magnet
METHOD 2: MAGNET UPSIDE DOWN
Print the design in mirror mode
Preheat the press to 200 ºC
Place the magnet on the base of the press and the printed part of the paper on the magnet. Fix them with thermal adhesive tape
Close the press with medium pressure for 150-190 seconds
With the help of a protective glove, remove the newly sublimated magnet
Carefully peel off the paper
Adhere the magnetic sheet to the base of the magnet
https://www.brildor.com/en/sublimation-ceramic-fridge-magnets26670Sublimation Ceramic Fridge Magnets<p class="enlace"><a id="know-more"></a> </p>
<h2>More information about the Sublimation Ceramic Fridge Magnets</h2>
<p> </p>
<p><strong>INDEX</strong></p>
<p>> <a href="#know-more1">Description</a></p>
<p>> <a href="#know-more2">Things to keep in mind</a></p>
<p>> <a href="#know-more3">Dimensions</a></p>
<p>> <a href="#know-more4">Recommended instructions and parameters for sublimation printing</a></p>
<p> </p>
<p class="enlace"><a id="know-more1"></a> </p>
<p><strong>DESCRIPTION</strong></p>
<ul>
<li>Reverse side of white matte with touch reverse side</li>
<li>Includes magnetic holders with adhesive to attach it to the base of the magnet after sublimation</li>
</ul>
<p> </p>
<p class="enlace"><a id="know-more2"></a> </p>
<p><strong>THINGS TO KEEP IN MIND</strong></p>
<ul>
<li>The rectangular magnets of <span class="azul-negrita">7 x 5 cm</span> are only differentiated by the type of edges: rounded (Ref. 049934) and straight (Ref. 056498)</li>
<li>The back tile is porous, so we recommend reinforcing the adhesive of the tile sheet from the magnet. For this, you can use some glue such as the ones you will find in <strong>Related Products</strong></li>
<li>The magnet can be sublimated either with the magnet face up (Method 2), as well as in reverse position (Method 1). You can see it in the <a title="sublimation instructions" href="#know-more4">instructions of</a> <a title="sublimation instructions" href="#know-more4">dye sublimation printing</a></li>
</ul>
<p> </p>
<p class="enlace"><a id="know-more3"></a> </p>
<p><strong>DIMENSIONS<br></strong></p>
<table >
<tbody>
<tr>
<td ><strong>Reference</strong></td>
<td style="text-align: center;"><strong>000505</strong></td>
<td style="text-align: center;"><strong>000504</strong></td>
<td style="text-align: center;"><strong>041181<br></strong></td>
<td style="text-align: center;"><strong>053636</strong></td>
<td style="text-align: center;"><strong>049934<br></strong></td>
<td style="text-align: center;"><strong>056498</strong></td>
<td style="text-align: center;"><strong>003868<br></strong></td>
</tr>
<tr>
<td ><strong>Shape</strong></td>
<td style="text-align: center;">Round</td>
<td style="text-align: center;">Square</td>
<td style="text-align: center;">Square</td>
<td style="text-align: center;">Heart</td>
<td style="text-align: center;">Rectangular</td>
<td style="text-align: center;">Rectangular</td>
<td style="text-align: center;">Rectangular</td>
</tr>
<tr>
<td ><strong>Dimensions (cm)<br></strong></td>
<td class="azul-negrita" style="text-align: center;">Ø5</td>
<td class="azul-negrita" style="text-align: center;">5 x 5</td>
<td style="text-align: center;"><span class="azul-negrita">6 x 6<br></span></td>
<td style="text-align: center;"><span class="azul-negrita">6.5 x 6.5<br></span></td>
<td style="text-align: center;"><span class="azul-negrita">7 x 5<br></span></td>
<td style="text-align: center;"><span class="azul-negrita">7 x 5</span></td>
<td style="text-align: center;"><span class="azul-negrita">8.5 x 5.4<br></span></td>
</tr>
<tr>
<td ><strong>Thickness (cm)<br></strong></td>
<td class="azul-negrita" style="text-align: center;">0.3</td>
<td class="azul-negrita" style="text-align: center;">0.4</td>
<td style="text-align: center;"><span class="azul-negrita">0.4<br></span></td>
<td style="text-align: center;"><span class="azul-negrita">0.3<br></span></td>
<td style="text-align: center;"><span class="azul-negrita">0.5<br></span></td>
<td style="text-align: center;"><span class="azul-negrita">0.5</span></td>
<td style="text-align: center;"><span class="azul-negrita">0.5<br></span></td>
</tr>
<tr>
<td ><strong>Magnetic holder (cm)<br></strong></td>
<td class="azul-negrita" style="text-align: center;">Ø4.5 x 0.1</td>
<td class="azul-negrita" style="text-align: center;">4.5 x 4.5 x 0.1</td>
<td style="text-align: center;"><span class="azul-negrita">5 x 5 x 0.1<br></span></td>
<td style="text-align: center;"><span class="azul-negrita">5.5 x 5.2 x 0.1<br></span></td>
<td style="text-align: center;"><span class="azul-negrita">6 x 4.3 x 0.1<br></span></td>
<td style="text-align: center;"><span class="azul-negrita">6.2 x 4.4 x 0.1</span></td>
<td style="text-align: center;"><span class="azul-negrita">5 x 5 x 0.1<br></span></td>
</tr>
<tr>
<td ><strong>Print area (cm)<br></strong></td>
<td class="azul-negrita" style="text-align: center;">Ø5</td>
<td class="azul-negrita" style="text-align: center;">5 x 5</td>
<td style="text-align: center;"><span class="azul-negrita">6 x 6<br></span></td>
<td style="text-align: center;"><span class="azul-negrita">6.5 x 6.5<br></span></td>
<td style="text-align: center;"><span class="azul-negrita">7 x 5</span></td>
<td style="text-align: center;"><span class="azul-negrita">7 x 5</span></td>
<td style="text-align: center;"><span class="azul-negrita">8.5 x 5.4<br></span></td>
</tr>
</tbody>
</table>
<p> </p>
<p class="enlace"><a id="know-more4"></a> </p>
<p><strong>RECOMMENDED INSTRUCTIONS AND PARAMETERS FOR SUBLIMATION PRINTING</strong></p>
<p>Parameters given <strong>for guidance</strong> only. It is recommended to carry out preliminary tests in order to make the necessary adjustments before starting production.</p>
<p><strong>METHOD 1: MAGNET IN REVERSE POSITION</strong></p>
<ul>
<li>Print the design in <strong>mirror mode</strong></li>
<li>Preheat the press to <span class="azul-negrita">200 ºC</span></li>
<li>Place the printed paper face up on the base of the press</li>
<li>Place the magnet upside down on the printed paper</li>
<li>Cover the ceramic magnet with a protective cloth</li>
<li>Close the press at <strong>medium-high pressure</strong> for <span class="azul-negrita">200-240 seconds</span></li>
<li>With the help of a protective glove, remove the sublimated magnet</li>
<li>Adhere the magnetic sheet to the base of the magnet</li>
</ul>
<p><strong>METHOD 2: MAGNET UPSIDE DOWN</strong></p>
<ul>
<li>Print the design in <strong>mirror mode</strong></li>
<li>Preheat the press to <span class="azul-negrita">200 ºC</span></li>
<li>Place the magnet on the base of the press and the printed part of the paper on the magnet. Fix them with thermal adhesive tape</li>
<li>Close the press with <strong>medium pressure</strong> for <span class="azul-negrita">150-190 seconds</span></li>
<li>With the help of a protective glove, remove the newly sublimated magnet</li>
<li>Carefully peel off the paper</li>
<li>Adhere the magnetic sheet to the base of the magnet</li>
</ul>https://www.brildor.com/media/catalog/product/i/m/imanes-de-ceramica-para-sublimacion-d19.jpg1.59instock01.59000https://www.brildor.com/media/catalog/product/i/m/imanes-de-ceramica-para-sublimacion-d19.jpg1461722995277205126151582/Blanks/Blanks/Magnets/Blanks/Souvenirs/Blanks/Magnets/Sublimation Assorted2021-07-24T06:11:21+0000